Every day more business environments are making a migration to Cloud or Kubernetes/Openshift and it is necessary to meet these requirements for demonstrations.
Kubernetes is not a friendly environment to carry it in a notebook with medium capacity (8GB to 16GB of RAM) and less with a demo that requires certain resources.
Table of Contents
Deploy Kubernetes on kubeadm, containerd, metallb and weave
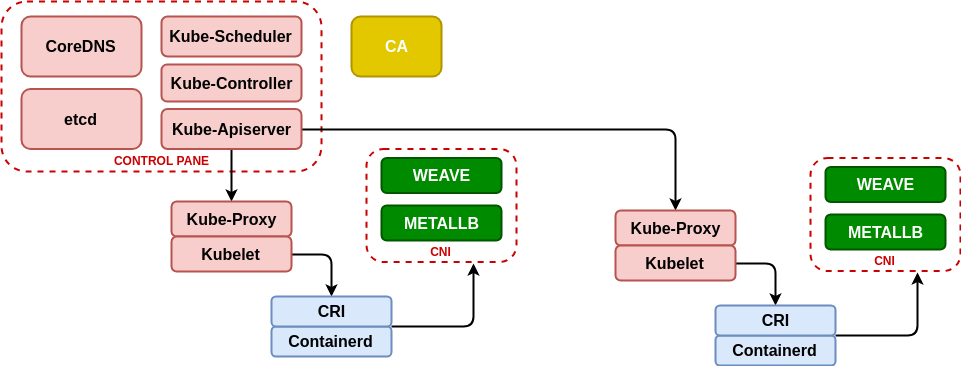
This case is based on the Kubeadm-based deployment (https://kubernetes.io/docs/setup/production-environment/tools/kubeadm/create-cluster-kubeadm/) for Kubernetes deployment, using containerd (https://containerd.io/) as the container life cycle manager and to obtain a minimum network management we will use metallb (https://metallb.universe.tf/) that will allow us to emulate the power of the cloud providers balancers (as AWS Elastic Load Balancer) and Weave (https://www.weave.works/blog/weave-net-kubernetes-integration/) that allows us to manage container networks and integrate seamlessly with metallb.
Finally, taking advantage of the infrastructure, we deploy the real-time resource manager K8dash (https://github.com/herbrandson/k8dash) that will allow us to track the status of the infrastructure and the applications that we deploy in it.
Although the Ansible roles that we have used before (see https://github.com/aescanero/disasterproject) allow us to deploy the environment with ease and cleanliness, we will examine it to understand how the changes we will use in subsequent chapters (using k3s) have an important impact on the availability and performance of the deployed demo/development environment.
First step: Install Containerd
The first step in the installation is the dependencies that Kubernetes has and a very good reference about them is the documentation that Kelsey Hightower makes available to those who need to know Kubernetes thoroughly (https://github.com/kelseyhightower/kubernetes-the-hard-way), especially of all those who are interested in Kubernetes certifications such as CKA (https://www.cncf.io/certification/cka/).

We start with a series of network packages
#Debian
sudo apt-get install -y ebtables ethtool socat libseccomp2 conntrack ipvsadm
#Centos
sudo yum install -y ebtables ethtool socat libseccomp conntrack-tools ipvsadm
We install the container life manager (a Containerd version that includes CRI and CNI) and take advantage of the packages that come with the Kubernetes network interfaces (CNI or Container Network Interface)
sudo sh -c "curl -LSs https://storage.googleapis.com/cri-containerd-release/cri-containerd-cni-1.2.7.linux-amd64.tar.gz |tar --no-overwrite-dir -C / -xz"The package includes the service for systemd so it is enough to start the service:
sudo systemctl enable containerd
sudo systemctl start containerd
Second Step: kubeadm and kubelet
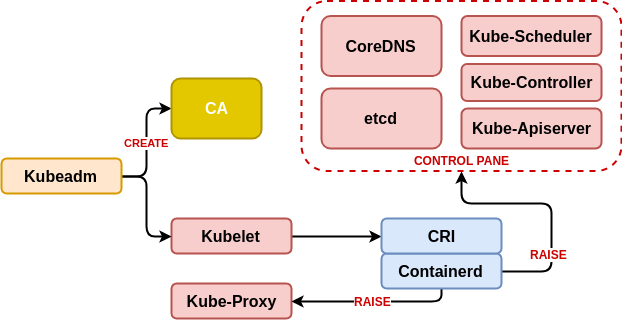
Now we download the executables of kubernetes, in the case of the first machine to configure it will be the “master” and we have to download the kubeadm binaries (the installer of kubernetes), kubelet (the agent that will connect with containerd on each machine. To know which one is the stable version of kubernetes we need to execute:
VERSION=`curl -sSL https://dl.k8s.io/release/stable.txt`And we download the binaries (in the master all and in the nodes only kubelet is necessary)
sudo curl -Ol https://storage.googleapis.com/kubernetes-release/release/$VERSION/bin/linux/amd64/{"kubectl","kubelet","kubeadm"} -o /usr/bin/"#1"
sudo chmod u+x /usr/bin/{"kubectl","kubelet","kubeadm"}
We configure a service for kubelet on each machine by creating the file /etc/systemd/system/kubelet.service that will depend on whether the machine has the function of master or node. For the master the content is:
[Unit]
Description=kubelet: The Kubernetes Node Agent
Documentation=http://kubernetes.io/docs/

[Service]
# This is a file that "kubeadm init" and "kubeadm join" generates at runtime, populating the KUBELET_KUBEADM_ARGS variable dynamically
EnvironmentFile=-/var/lib/kubelet/kubeadm-flags.env
Environment="KUBELET_EXTRA_ARGS='--network-plugin=cni --container-runtime=remote --container-runtime-endpoint=unix:///run/containerd/containerd.sock --node-ip={{ vm_ip }}'"
Environment="KUBELET_KUBECONFIG_ARGS='--bootstrap-kubeconfig=/etc/kubernetes/bootstrap-kubelet.conf --kubeconfig=/etc/kubernetes/kubelet.conf'"
Environment="KUBELET_CONFIG_ARGS='--config=/var/lib/kubelet/config.yaml'"
ExecStart=/usr/bin/kubelet $KUBELET_KUBECONFIG_ARGS $KUBELET_CONFIG_ARGS $KUBELET_KUBEADM_ARGS $KUBELET_EXTRA_ARGS
Restart=always
StartLimitInterval=0
RestartSec=10

[Install]
WantedBy=multi-user.target
For the other nodes:
[Unit]
Description=kubelet: The Kubernetes Node Agent
Documentation=http://kubernetes.io/docs/

[Service]
Environment="KUBELET_EXTRA_ARGS='--network-plugin=cni --container-runtime=remote --container-runtime-endpoint=unix:///run/containerd/containerd.sock --node-ip={{ vm_ip }}'"
Environment="KUBELET_KUBECONFIG_ARGS='--bootstrap-kubeconfig=/var/lib/kubelet/bootstrap-kubeconfig --kubeconfig=/var/lib/kubelet/kubeconfig'"
ExecStart=/usr/bin/kubelet $KUBELET_KUBECONFIG_ARGS $KUBELET_CONFIG_ARGS $KUBELET_EXTRA_ARGS
Restart=always
StartLimitInterval=0
RestartSec=10

[Install]
WantedBy=multi-user.target
Once the configuration is loaded, we proceed to use kubeadm on the first node (master), indicating the ip to be published, the internal network of the pods (a /16, don’t forget that it is a demo/development environment so that shouldn’t be a problem.) We are not going to use kubeadm on the rest of the nodes, so we do not need to collect information about the execution of this command (the token showed in console isn’t neccesary).
$ sudo kubeadm init --apiserver-advertise-address {{ vm_ip }} --pod-network-cidr=10.244.0.0/16 --cri-socket /run/containerd/containerd.sock
Third step: MetalLB (layer 4 load balancer) and Weave (network management)
Before preparing the nodes we proceed to load two elements, the first “metallb” will allow us to have “loadbalancer” services accessible in the same range as the virtual machines and the second “weave” is a network manager that will allow the communication between pods that run in different machines within the network that we have defined above. Both services are loaded with the following commands executed in master:
$ sudo mkdir ~/.kube
$ sudo cp -i /etc/kubernetes/admin.conf ~/.kube/config
$ sudo kubectl apply -f "https://cloud.weave.works/k8s/net?k8s-version=$(sudo kubectl version | base64 | tr -d '\n')"
$ sudo kubectl apply -f "https://raw.githubusercontent.com/danderson/metallb/master/manifests/metallb.yaml"
Fourth step: Add nodes
To add the nodes we have to create a user, as we don’t have integration with ldap or active directory, we will use “system accounts” or sa. For this we’ll generate a “initnode” account to add the nodes with the following yaml:
apiVersion: v1
kind: ServiceAccount
metadata:
  creationTimestamp: null
  name: initnode
  namespace: kube-system
---
apiVersion: rbac.authorization.k8s.io/v1beta1
kind: ClusterRoleBinding
metadata:
  creationTimestamp: null
  name: initauth
  namespace: kube-system
roleRef:
  apiGroup: rbac.authorization.k8s.io
  kind: ClusterRole
  name: system:node-bootstrapper
subjects:
- kind: ServiceAccount
  name: initnode
  namespace: kube-system
Once the service account is generated, we execute kubectl get serviceaccount -n kube-system initnode -o=jsonpath="{.secrets[0].name}" which will give us the name of the token and kubectl get secrets "TOKEN_NAME" -n kube-system -o=jsonpath="{.data.token}"|base64 -d will give us the value of the token that we have to save.
In addition to creating the user, you must create a startup configuration for the nodes, for this we execute the following commands:
$ sudo kubectl config set-cluster kubernetes --kubeconfig=~/bootstrap-kubeconfig --certificate-authority=/etc/kubernetes/pki/ca.crt --embed-certs --server
$ sudo kubectl config set-credentials initnode --kubeconfig=~/bootstrap-kubeconfig --token=VALOR_TOKEN
$ sudo kubectl config set-context initnode@kubernetes --cluster=kubernetes --user=initnode --kubeconfig=~/bootstrap-kubeconfig
$ sudo kubectl config use-context initnode@kubernetes --kubeconfig=~/bootstrap-kubeconfig
The generated file must be copied to all the nodes in/var/lib/kubelet/bootstrap-kubeconfig and start the kubelet service on each node that will be in charge of contacting request access to the master.
sudo systemctl enable kubelet
sudo systemctl start kubelet
Para autorizar el o los nodos en el master hemos de ir al mismo y consultar por las peticiones con el comando kubectl get certificatesigningrequests.certificates.k8s.io
, y autorizarlas con el comando kubectl certificate approve
To authorize the node(s) in the master, we must ask for requests in the master with the command kubectl get certificatesigningrequests.certificates.k8s.io
, and authorize them with the kubectl certificate approve command.
Once the nodes are authorized, we will have the ability to use this platform.
