Kubernetes dashboards 2

After a first article (Kubernetes Dashboards 1) on generalist Kubernetes Dashboards, this article focuses on those dashboards that are geared to certain needs.

Specifically we will focus on three dashboards that go to three needs: Look into the status of a large number of pods, see the relationships between objects and get an overview on a platform kubernetes on docker.

Kubernetes Dashboards

Kube-ops-view

With 1200 stars in Github, this project presents a very basic dashboard thinking of large server farms, where we have an important volume of pods that we need to review at a glance.

How to install

We create a namespace to install kube-ops-view:

kubectl create namespace kube-ops-view --dry-run -o yaml | kubectl apply -f -

We create a system account with administrator capabilities

kubectl create -n kube-ops-view serviceaccount kube-ops-view-sa --dry-run -o yaml | kubectl apply -f -
kubectl create clusterrolebinding kube-ops-view-sa --clusterrole=cluster-admin --serviceaccount=kube-ops-view:kube-ops-view-sa --dry-run -o yaml | kubectl apply -f -

And we do execution of a deployment together with a service for its publication

cat <<EOF |kubectl apply -n kube-ops-view -f -
 ---
apiVersion: v1
kind: Service
metadata:
  name: kube-ops-view
  namespace: kube-ops-view
spec:
  ports:
  - name: http
    port: 80
    protocol: TCP
    targetPort: 8080
  selector:
    app: kube-ops-view
  type: LoadBalancer
---
apiVersion: apps/v1
kind: Deployment
metadata:
  labels:
    app: kube-ops-view
  name: kube-ops-view
spec:
  replicas: 1
  selector:
    matchLabels:
      app: kube-ops-view
  template:
    metadata:
      labels:
        app: kube-ops-view
    spec:
      serviceAccountName: kube-ops-view-sa
      containers:
      - image: hjacobs/kube-ops-view:0.11
        name: kube-ops-view
        ports:
        - containerPort: 8080

Despite being a single service (without authentication, important), its container is similar in size to the solutions shown before:

docker.io/hjacobs/kube-ops-view                   0.11                fd70a70b6d70d       40.8MB

So its deployment must be fast.

Features

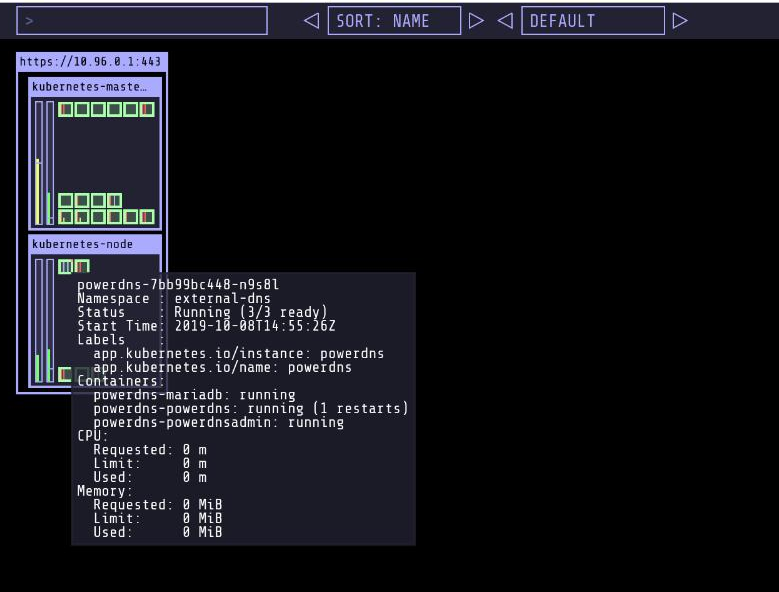
Its interface, shown in the following figure is minimal:
Kubernetes dashboards 2 1

Without options to enter the objects or to edit, the information appears when passing over the “boxes”.

Easy to use

Clearly limited for those who start in Kubernetes or want additional information about objects, but very useful for those who want to visualize large volumes of pods.… Read the rest “Kubernetes dashboards 2”
Kubernetes dashboards 1

One of the first difficulties when starting to work with Kubernetes is the lack of understandable tools to manage Kubernetes. Kubernetes dashboards (platform management tools) become the entry point for those who want to learn Kubernetes.

In this series of articles we will examine some of the most used dashboards, including some more specific (octant, kontena) and leaving those oriented to PaaS / CaaS (Rancher, Openshift) because in both cases the scope of entry level Kubernetes tools is exceeded.

Kubernetes dashboards

Kubernetes Dashboard

With more than 6000 stars on GitHUb, the official Kubernetes dashboard is the standard option for this type of solutions, because of its dependencies and its lack of compatibility with the current versions of Kubernetes we will only focus on v2 versions -beta3.

How to install

Executing the command:

kubectl apply -f https://raw.githubusercontent.com/kubernetes/dashboard/v2.0.0-beta3/aio/deploy/recommended.yaml

It is installed in the “kubernetes-dashboard” namespace and to obtain the metrics it uses the “dashboard-metrics-scraper” service that is installed in the same namespace.

It must be accessed via external IP (LoadBalancer or kubectl proxy service), or configure an Ingress with the same SSL certificates as the console (which complicates its deployment).

The containers that are part of this solution are:

docker.io/kubernetesui/dashboard                  v2.0.0-beta3        6feddba9df747       32MB
docker.io/kubernetesui/metrics-scraper          v1.0.1               709901356c115       16.1MB

So its deployment has to be fast, since although they are two services, they are small in size.

Features

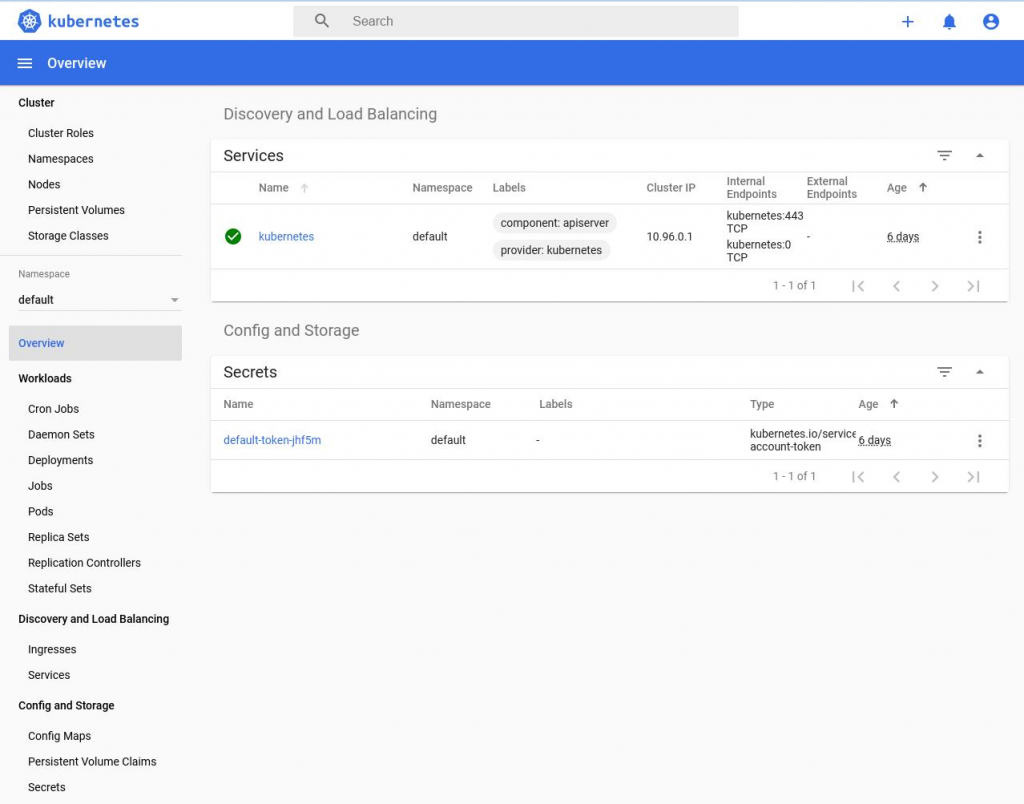
It has a clean and clear interface, token authentication and a dashboard where on one side we have all the main elements of Kubernetes and in the main part of the panel a list of the selected elements in the selected namespace.

Main panel:

Kubernetes dashboards

For convenience, it has a dark theme, among the elements it allows access to, we have security roles. In addition, each selected element has two actions: edit and delete.… Read the rest “Kubernetes dashboards 1”

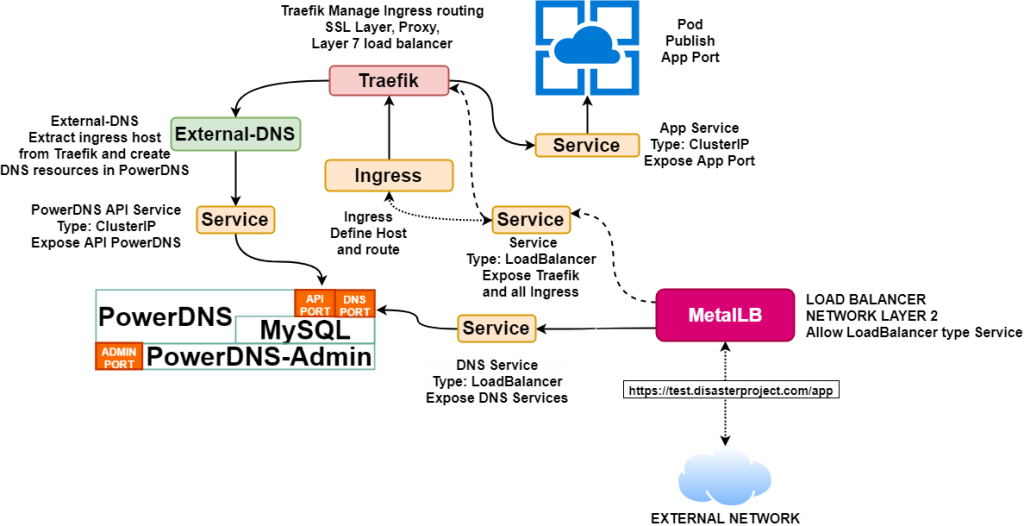
How to publish Kubernetes with External DNS, MetalLB and Traefik.

Kubernetes with External DNS, MetalLB and Traefik will help us to have web applications (in a microservice environment or not) be published, since the basic requirements are to resolve the name of the computer and the web path that leads to the DNS. application.

The big map

How to publish Kubernetes with External DNS, MetalLB and Traefik. 29

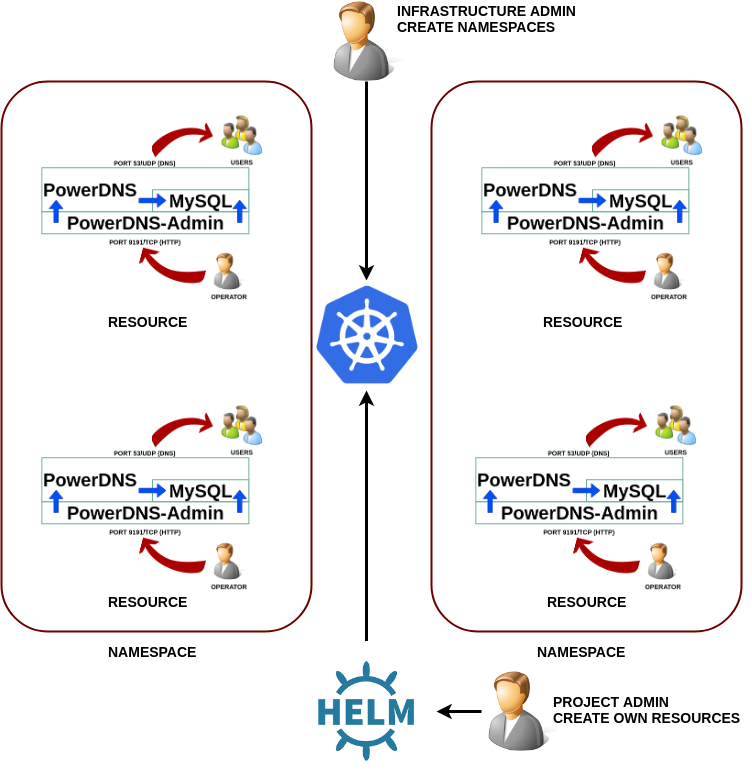
After the steps taken in K3s: Simplify Kubernetes and Helm v3 to deploy PowerDNS over Kubernetes we are going to shape a more complete Kubernetes solution so that you can publish services under your own domain and route and be accessible from outside. Always using the minimum resources in this task.

MetalLB

MetalLB will allow us to emulate the power of the load balancers of the Cloud providers, the requirements of this solution are Kubernetes version 1.13 or higher, and must be no other network balancer operating and that the network controller is supported in the list indicated in https://metallb.universe.tf/installation/network-addons/, we must bear in mind that K3s includes flannel that is supported and that in the case of others like Weave some modifications are required.

To install MetalLB you only need to apply the “yaml” file that deploy all the elements:

$ sudo kubectl apply -f "https://raw.githubusercontent.com/danderson/metallb/master/manifests/metallb.yaml"

And to activate MetalLB we must create a configuration (file pool.xml) that contains something like this:

apiVersion: v1
kind: ConfigMap
metadata:
  namespace: metallb-system
  name: config
data:
  config: |
    address-pools:
    - name: my-ip-space
      protocol: layer2
      addresses:
      - 192.168.8.240/28

When applied with k3s kubectl apply -f pool.yml will configure MetalLB so that if there are services with “loadBalancer” they use one of the IPs defined in the specified range (in this case 192.168.9.240/28).

MetalLB give us a great advantage over other types of local solutions, since it does not require the use of SDN (such as Kubernetes on VMware NSX) or specific servers for publishing (such as OpenShift, which in addition to SDN, need specific machines to publish services).… Read the rest “How to publish Kubernetes with External DNS, MetalLB and Traefik.”

Helm v3 to deploy PowerDNS over Kubernetes

In the article about PowerDNS on Docker or Podman, easy to run we leave pending its realization on Kubernetes, this is because Kubernetes service structure is much more complex than that Docker or Podman and therefore a completely different approach must be made.

Helm v3 to deploy PowerDNS over Kubernetes 35

Package with Helm v3

The first thing to keep in mind is package applications so that the deployment doesn’t require extensive knowledge about Kubernetes (make life easier for the user, the developer) and the second is that we can have many users on the same environment wishing to raise the same application and we can’t create a package for each one, we must to be able to reuse the package we have created.

In Kubernetes the package standard is Helm , that will allow us to manage deployments easily and be reusable by user, project, etc. The Helm package consists of:

  • Chart.yaml: Where the meta information about the package itself is.
  • templates: Folder where we are going to define the objects that are going to be deployed in Kubernetes, but that will have certain modifications so that they are flexible.
  • values.yaml: In the objects to be deployed there will be a series of variables to be defined (eg servers to access, access codes, databases on a remote server, etc.), in this file we define the predefined values of each variable, later, the user who launches the package can adjust it.
  • NOTES.txt: Is placed within “templates” this file and will contain a message about the result of the package installation, such as the IP obtained or entry URL.
  • _helpers.tpl: This file that we will also find inside the “templates” folder and contains definitions of variables that we can use in the objects, such as the name of the package and will allow us to make multiple deployments of the same application in the same namespace simply by changing the deployment version name.
Read the rest “Helm v3 to deploy PowerDNS over Kubernetes”
Open post
PowerDNS on Docker or Podman, easy to run 36

PowerDNS on Docker or Podman, easy to run

What is PowerDNS and DNS as a critical service

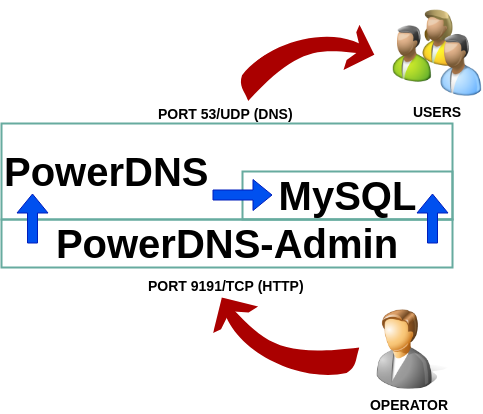
PowerDNS is a DNS server, an especially critical service in any infrastructure that we want to deploy, since this is the main connection between services and operators.

If of all the options we find when we look for a DNS server (we can see a long list at https://en.wikipedia.org/wiki/Comparison_of_DNS_server_software) we look for the following three conditions: can be easily managed, simple deployment and OpenSource. We are going to stay in only one option: PowerDNS and for its management PowerDNS-admin.

PowerDNS (whose development can be seen at https://github.com/PowerDNS/pdns and has more than 1800 stars) is a powerful DNS server whose most interesting features for management are a web service with a powerful API and be able to store information in databases, such as MySQL.

And we select PowerDNS-Admin for two reasons: It is actively maintained (https://github.com/ngoduykhanh/PowerDNS-Admin, more than 750 stars) and visually it is a more friendly environment by having similar format as RedHat tools are currently using.

Why PowerDNS with PowerDNS-Admin?

Because they make up a powerful package where we have the following advantages:

  • Easy to install
  • Easy to maintain
  • Intuitive interface
  • Everything is stored in a database (which facilitates replication, backups, high availability, etc.)
  • It does not require special browser settings (such as RedHat IDM that requires installing the server certificate in clients)
  • Has authentication against multiple sources (LDAP, AD, SAML, Github, Google, etc.)
  • Has domain access permissions

To these advantages we must add the existence of multiple containers images that greatly facilitate how to deploy and update this solution.

PowerDNS on Docker or Podman, easy to run 37

Deploy PowerDNS with Docker-Composer

La solución con PowerDNS consta de tres partes: el servidor dns, para el cual haremos uso de contenedor pschiffe/pdns-mysql:alpine (https://github.com/pschiffe/docker-pdns/tree/master/pdns), el servidor de base de datos mariadb a través del contenedor yobasystems/alpine-mariadb
(https://github.com/yobasystems/alpine-mariadbRead the rest “PowerDNS on Docker or Podman, easy to run”

Kubernetes: adventures and misadventures of patching (kubectl patch).

Kubernetes is a powerful container orchestration tool where many different objects are executed and at some point in time we will be interested in modifying.

For this, Kubernetes offers us an interesting mechanism: patch, we are going to explain how to patch and we will see that this tool is far from being enough tool as would be desirable.

Patching operations in Kubernetes

According to the Kubernetes documentation and the Kubernetes API rules, three types are defined (with –type):

Strategic

This is the type of patch that Kubernetes uses by default and is a native type, defined in the SIG. It follows the structure of the original object but indicating the changes (by default join: merge, that’s why it is known as strategic merge patch) in a yaml file. For example: if we have the following service (in service.yml file):

apiVersion: v1
kind: Service
metadata:
  labels:
    app: traefik
  name: traefik
  namespace: kube-system
spec:
  clusterIP: 10.43.122.171
  externalTrafficPolicy: Cluster
  ports:
  - name: http
    nodePort: 30200
    port: 80
    protocol: TCP
    targetPort: http
  - name: https
    nodePort: 31832
    port: 443
    protocol: TCP
    targetPort: https
  selector:
    app: traefik
  type: LoadBalancer

We are going to use the command kubectl patch -f service.yml --type="strategic" -p "$(cat patch.yml)" --dry-run -o yaml to allow us to perform tests on objects without the danger of modifying its content in the Kubernetes cluster.

In this case, if we want this service to listen for an additional port, we will use the “merge” strategy and apply the following patch (patch.yml):

spec:
  ports:
  - name: dashboard
    port: 8080
    protocol: TCP
    targetPort: dashboard

As we can see, the patch only follows the service object as far as we want to make the change (the “ports” array) and being a “strategic merge” type change it will be added to the list as seen in the command dump:

...
Read the rest “Kubernetes: adventures and misadventures of patching (kubectl patch).”

Posts navigation

1 2 3
Scroll to top